Categorías
Consola Portátil

Game Boy Family

Game Boy

In this post i try to show you one of the amazing devices i used to play games every day, yes i know is this an another post about the Game Boy, and it is because i love so much this handled console i have few of this and a few games to play everyday in every moment, and you think at the end of this post i just talk a few moment, but i like the wikipedia page for the history of this device.

My #GameBoy Family
GameBoy DMG

History

By Wikipedia

The Game Boy is an 8-bit handheld game console developed and manufactured by Nintendo. The first handheld in the Game Boy family, it was first released in Japan on April 21, 1989, then North America, three months later, and lastly in Europe, nearly a year after. It was designed by the same team that developed the Game & Watch and several Nintendo Entertainment System games: Satoru Okada, Gunpei Yokoi, and Nintendo Research & Development 1.

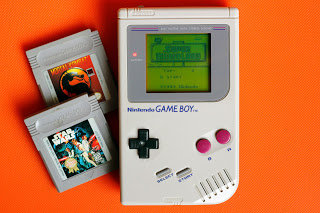
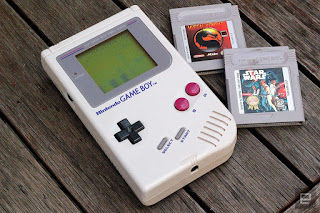
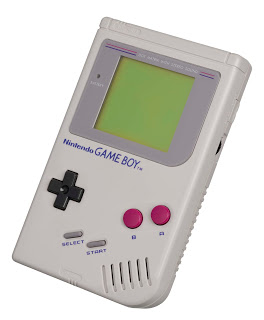
Nintendo’s second handheld game console, the Game Boy combines features from both the NES home system and Game & Watch hardware. The console features a dull green dot-matrix screen with adjustable contrast dial, five control buttons (a directional pad, two game buttons, and start and select), a single speaker with adjustable volume dial, and, like its rivals, uses cartridges as physical media for games. The color scheme is made from two tones of grey with accents of black, blue, and dark magenta. All the corners of the portrait-oriented rectangular unit are softly rounded, save for the bottom right, which is curved. At launch, it was sold either as a standalone unit, or bundled with one of several games: Super Mario Land or Tetris among them. Several accessories were also developed, including a carrying pouch and printer.

Despite being technically inferior to its fourth-generation competitors (Sega’s Game Gear, Atari’s Lynx, and NEC’s TurboExpress), the Game Boy received praise for its battery life and durability in its construction. It quickly outsold the competition, selling one million units in the United States within a few weeks. The Game Boy and its successor, the Game Boy Color, have sold an estimated 118 million units worldwide. It is one of the most recognizable devices from the 1990s, becoming a cultural icon in the years following its release. Several redesigns were released during the console’s lifetime, including the Game Boy Pocket (1996) and the Game Boy Light (1998; Japan only). Production of the Game Boy continued into the early 2000s, even after the release of its successor, the Game Boy Advance, in 2001. Production ceased in 2003.

GameBoy DMG

Redesigns

Classic Game Boy family
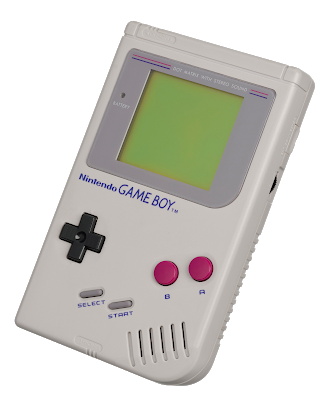
Game Boy

The original gray Game Boy was first released in Japan on April 21, 1989. Based on a Z80 processor, it has a black and green reflective LCD screen, an eight-way directional pad, two action buttons (A and B), and Start and Select buttons with the controls being identical to the NES controller. It plays games from ROM-based media contained in cartridges (sometimes called carts or Game Paks). Its graphics are 8-bit (similar to the NES).

The game that pushed the Game Boy into the upper reaches of success was Tetris. Tetris was widely popular, and on the handheld format could be played anywhere. It came packaged with the Game Boy, and broadened its reach; adults and children alike were buying Game Boys in order to play Tetris. Releasing Tetris on the Game Boy was selected as #4 on GameSpy’s “25 Smartest Moments in Gaming”.

The original Game Boy was one of the first cartridge-based systems that supported more than four players at one time (via the link port). In fact, it has been shown that the system could support 16 simultaneous players. However, this feature was only supported in Faceball 2000.

In 1995, the “Play it Loud” version of the original Game Boy was released in five different colors; red, yellow, green, blue , white and clear. With sports variations in between.
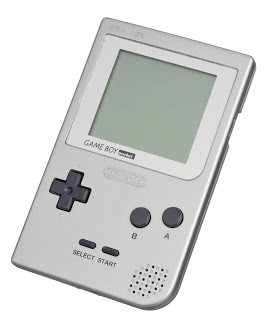
GameBoy DMG

Game Boy Pocket

The Game Boy Pocket is a redesigned version of the original Game Boy having the same features. It was released in 1996. Notably, this variation is smaller and lighter. It comes in seven different colors; red, yellow, green, black, clear, silver, blue, and pink.

Another notable improvement over the original Game Boy is a black-and-white display screen, rather than the green-tinted display of the original Game Boy, that also featured improved response time for less blurring during motion. The Game Boy Pocket takes two AAA batteries as opposed to four AA batteries for roughly ten hours of gameplay. The first model of the Game Boy Pocket did not have an LED to show battery levels, but the feature was added due to public demand.

GameBoy Pocket

Game Boy Light

In April 1998, a variant of the Game Boy Pocket named Game Boy Light was exclusively released in Japan. The differences between the original Game Boy Pocket and the Game Boy Light is that the Game Boy Light takes on two AA batteries for approximately 20 hours of gameplay (when playing without using the light), rather than two AAA batteries, and it has an electroluminescent screen that can be turned on or off. This electroluminescent screen gave games a blue-green tint and allowed the use of the unit in darkened areas. Playing with the light on would allow about 12 hours of play. The Game Boy Light also comes in six different colors; silver, gold, yellow for the Pokémon edition, translucent yellow, clear and translucent red for the Astro Boy edition. The Game Boy Light was superseded by the Game Boy Color six months later and was the only Game Boy to have a backlit screen until the release of the Game Boy Advance SP AGS-101 model in 2003.

Game Boy Color Family
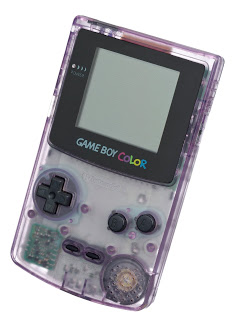
Game Boy Color

First released in Japan on October 21, 1998, the Game Boy Color (abbreviated as GBC) added a (slightly smaller) color screen to a form factor similar in size to the Game Boy Pocket. It also has double the processor speed, three times as much memory, and an infrared communications port. Technologically, it was likened to the 8-bit NES video game console from the 1980s although the Game Boy Color has a much larger color palette (56 simultaneous colors out of 32,768 possible) which had some classic NES ports and newer titles. It comes in seven different colors; Clear purple, purple, red, blue, green, yellow and silver for the Pokémon edition. Like the Game Boy Light, the Game Boy Color takes on two AA batteries. It was the final handheld to have 8-bit graphics.

A major component of the Game Boy Color is its near-universal backward compatibility; that is, a Game Boy Color is able to read older Game Boy cartridges and even play them in a selectable color palette (similar to the Super Game Boy). The only black & white Game Boy games known to be incompatible are Road Rash and Joshua & the Battle of Jericho. Backwards compatibility became a major feature of the Game Boy line, since it allowed each new launch to begin with a significantly larger library than any of its competitors. Some games written specifically for the Game Boy Color can be played on older model Game Boys, whereas others cannot.

GameBoy Color

Game Boy Advance family
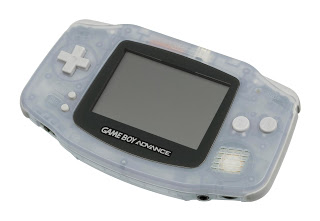
Game Boy Advance

In Japan, on March 21, 2001, Nintendo released a significant upgrade to the Game Boy line. The Game Boy Advance (also referred to as GBA) featured a 32 bit 16.8 MHz ARM. It included a Z80 processor and a switch activated by inserting a Game Boy or Game Boy Color game into the slot for backward compatibility, and had a larger, higher resolution screen. Controls were slightly modified with the addition of “L” and “R” shoulder buttons. Like the Game Boy Light and Game Boy Color, the Game Boy Advance takes on two AA batteries. The system was technically likened to the SNES and showed its power with successful ports of SNES titles such as Super Mario World, Super Mario World 2: Yoshi’s Island, The Legend of Zelda: A Link to the Past and Donkey Kong Country. There were also new titles that could be found only on the GBA, such as Mario Kart: Super Circuit, F-Zero: Maximum Velocity, Wario Land 4, Mario & Luigi: Superstar Saga and more. A widely criticized drawback of the Game Boy Advance is that the screen is not backlit, making viewing difficult in some conditions. The Game Paks for the GBA are roughly half the length of original Game Boy cartridges and Game Boy Color cartridges, and so older Game Paks would stick out of the top of the unit. When playing older games, the GBA provides the option to play the game at the standard equal square resolution of the original screen or the option to stretch it over the wider GBA screen. The selectable color palettes for the original Game Boy games are identical to what it was on the Game Boy Color. The only Game Boy Color games known to be incompatible are Pocket Music and Chee-Chai Alien. It was the final handheld to require regular batteries.
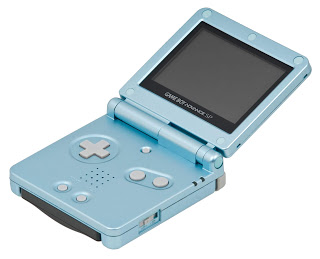
GameBoy Advance

Game Boy Advance SP

First released in Japan on February 14, 2003, the Game Boy Advance SP—Nintendo model AGS-001—resolved several problems with the original Game Boy Advance model. It featured a new smaller clamshell design with a flip-up screen, a switchable internal frontlight, a rechargeable battery for the first time, and the only notable issue is the omission of the headphone jack, which requires a special adapter, purchased separately. In September 2005, Nintendo released the Game Boy Advance SP model AGS-101, that featured a high quality backlit screen instead of a frontlit, similar to the Game Boy Micro screen but larger. It was the final Game Boy and last handheld to have backwards compatibility with Game Boy and Game Boy Color games.
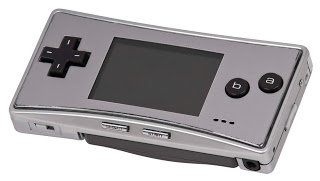
GameBoy Advance SP

Game Boy Micro

The third form of Game Boy Advance system, the Game Boy Micro is four and a half inches wide (10 cm), two inches tall (5 cm), and weighs 2.8 ounces (80 g). By far the smallest Game Boy created, it has approximately the same dimensions as an original NES controller pad. Its screen is approximately 2/3 the size of the SP and GBA screens while maintaining the same resolution (240×160 pixels) but now has a higher quality backlit display with adjustable brightness. Included with the system are two additional faceplates which can be swapped to give the system a new look; Nintendo of America sold additional faceplates on its online store. In Europe, the Game Boy Micro comes with a single faceplate. In Japan, a special Mother 3 limited edition Game Boy Micro was released with the game in the Mother 3 Deluxe Box. Unlike the Game Boy Advance and Game Boy Advance SP, the Game Boy Micro is unable to play any original Game Boy or Game Boy Color games, only playing Game Boy Advance titles (with the exception of the Nintendo e-Reader, discontinued in America, but still available in Japan).

GameBoy Advance Micro

Game Paks

Each video game is stored on a plastic cartridge, officially called a “Game Pak” by Nintendo. All cartridges, excluding those for Game Boy Advance, measure 5.8 by 6.5 cm. The cartridge provides the code and game data to the console’s CPU. Some cartridges include a small battery with SRAM, flash memory chip, or EEPROM, which allows game data to be saved when the console is turned off. If the battery runs out in a cartridge, then the save data will be lost, however, it is possible to replace the battery with a new battery. To do this, the cartridge must be unscrewed, opened up, and the old battery would be removed and replaced. This may require desoldering the dead battery and soldering the replacement in place. Before 2003, Nintendo used round, flat watch batteries for saving information on the cartridges. These batteries were replaced in newer cartridges because they could only live for a certain amount of time.

The cartridge is inserted into the console cartridge slot. If the cartridge is removed while the power is on, and the Game Boy does not automatically reset, the game freezes; the Game Boy may exhibit unexpected behavior, such as rows of zeros appearing on the screen, the sound remaining at the same pitch as was emitted the instant the game was pulled out, saved data may be corrupted, and hardware may be damaged. This applies to most video game consoles that use cartridges.

The original Game Boy power switch was designed to prevent the player from being able to remove the cartridge while the power is on. Cartridges intended only for Game Boy Color (and not for the original Game Boy) lack the “notch” for the locking mechanism present in the top of the original cartridges, preventing operation on an original Game Boy (the cartridge can be inserted, but the power switch cannot be moved to the “on” position). Even if this was bypassed by using a Game Boy Pocket, Game Boy Light, or Super Game Boy (and its Japanese-only follow-up), the game would not run, and an image on the screen would inform the user that the game is only compatible with Game Boy Color systems. One exception would be the Kirby Tilt ‘n’ Tumble game: despite the game cartridge featuring a notch, enabling it to be inserted on the original Game Boy, the game displays an error message indicating that it only plays on Game Boy Color. Chee Chai Alien and Pocket Music are incompatible with Game Boy Advance models, displaying an error message indicating that they only play on Game Boy Color.

Game Boy Advance cartridges used a similar physical lock-out feature. Notches were located at the base of the cartridge’s two back corners. One of these notches was placed as to avoid pressing a switch inside the cartridge slot. When an older Game Boy or Game Boy Color game was inserted into the cartridge slot, the switch would be pressed down and the Game Boy Advance would start in Game Boy Color mode, while a Game Boy Advance cartridge would not touch the switch and the system would start in Game Boy Advance mode. The Nintendo DS replaced the switch with a solid piece of plastic that would allow Game Boy Advance cartridges to be inserted into Slot 2, but would prevent an older Game Boy or Game Boy Color cartridge from being inserted fully into the slot.

Excluding game-specific variations, there are four types of cartridges compatible with Game Boy systems:

The original grey Game Boy Game Pak

  • Grey cartridges (Also known as class A) are compatible with all Game Boy systems, excluding Game Boy Micro. All original Game Boy games are of this type. Some of these cartridges are in alternative colors, such as red or blue for Pokémon Red and Blue, and yellow for the Donkey Kong Land series. The games on these cartridges are programmed in black and white; the Game Boy Color and later systems provide selectable color palettes for them. Some grey cartridges that were released between 1994 and 1998 have Super Game Boy enhancements. Even fewer grey cartridges were released with built-in features that made them protrude from the slot, but included the notch to be compatible with the original Game Boy (notably the Game Boy Camera)

The black Game Boy Game Pak

The clear Game Boy Color Game Pak

  • Clear cartridges (Also known as class C) are compatible with Game Boy Color and later systems, excluding Game Boy Micro. Some games (such as Pokémon Crystal) were released in specially colored cartridges, as had been done before, but the new colors remained translucent. Some clear cartridges have built-in features, including rumble features (Perfect Dark) and tilt sensors (Kirby Tilt ‘n’ Tumble). These cartridges are a slightly different shape from the earlier varieties, and would obstruct the latch if inserted into the original Game Boy. Unlike the Gray cartridges and Black cartridges, the Clear cartridges cannot be played on a Game Boy Pocket, a Game Boy Light or on Super Game Boy (or even its Japanese follow-up).[citation needed] Some class C cartridges (European version of V-Rally: Championship Edition) used a solid cartridge design, like in Class B.

The Game Boy Advance Game Pak

  • Advance cartridges (Also known as class D) are half the size of all earlier cartridges and are compatible with Game Boy Advance and later systems including the Nintendo DS. Some cartridges are colored to resemble the game (usually for the Pokémon series; Pokémon Emerald, for example, being a clear emerald green). They are also compatible with Nintendo DS and DS Lite (but see the Reception section for limitations). Some Advance cartridges have built-in features, including rumble features (Drill Dozer), tilt sensors (WarioWare: Twisted!, Yoshi’s Universal Gravitation) and solar sensors (Boktai).
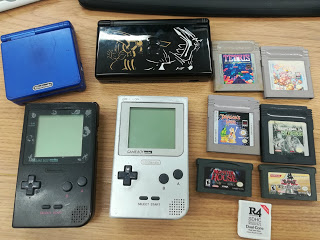
My Nintendo Family

Instead of all history tell before, i show you one of my Nintendo family.

  • 2 Game Boy Pocket
  • 1 Game Boy Advance SP
  • 1 Nintendo DS Lite
  • 4 Game Boy Packs
  • 2 Game Boy Advance Packs
  • 1 Nintendo DS R4

My #GameBoy Family
Like you see the Game Boy Family was an exceptional playing devices, now the family continues in the Nintendo 3DS Systems and Nintendo Switch, not also like the Game Boy but very powerful devices.

Categorías
Desarrollo

Cambiar de SVN a Git en sistema de versiones.

Que es SVN

Apache SUBVERSION(abreviado frecuentemente como SVN, por el comando svn) es una herramienta de control de versiones open source basada en un repositorio cuyo funcionamiento se asemeja enormemente al de un sistema de ficheros. Es un software libre bajo una licencia de tipo Apache/BSD.

Utiliza el concepto de revisión para guardar los cambios producidos en el repositorio. Entre dos revisiones sólo guarda el conjunto de modificaciones(delta), optimizando así al maximo el uso de espacio en disco. SVN permite al usuario crear, copiary borrar carpetas con la misma flexibilidad con la que lo haria si estuviese en su disco local. Dada su flexibilidad, es necesaria la aplicacion de buenas practicas para llevar a cabo una correcta gestion de las versiones del software generado.

Subversion puede acceder al repositorio a través de redes, lo que le permite ser usado por personas que se encuentran en distintas computadoras. A cierto nivel, la posibilidad de que varias personas puedan modificar y administrar el mismo conjunto de datos desde sus respectivas ubicaciones fomenta la colaboración. Se puede progresar más rápidamente sin un único conducto por el cual deban pasar todas las modificaciones. Y puesto que el trabajo se encuentra bajo el control de versiones, no hay razón para temer por que la calidad del mismo vaya a verse afectada –si se ha hecho un cambio incorrecto a los datos, simplemente deshaga ese cambio.

Ventajas y Desventajas de usar SVN

Ventajas

  • Se sigue la historia de los archivos y directorios a través de copias y renombrados.

  • Las modificaciones(incluyendo cambios a varios archivos) son atómicas[1].

  • La creacion de ramas y etiquetas es una operación más eficiente.

  • Se envían sólo las diferencias en ambas direcciones.

Desventajas

  • El manejo de cambio de nombres de archivos no es completo. Lo maneja como la suma de una operación de copia y una de borrado.

  • No resuelve el problema de aplicar repetidamente parches entre ramas, no facilita llevar la cuenta de quó cambios se han realizado. Esto se resuelve siendo cuidadoso con los mensajes.

Que es Git

Git es un software de control de versiones diseóado por Linus Torvalds, pensandoen la eficiencia y la confiabilidad del mantenimiento de versiones de aplicaciones cuando éstas tienen un gran número de archivos de código fuente. Supropósito es llevar el registro de los cambios en archivos de computadora y coordinar el trabajo que varias personas realizan sobre archivos compartidos.

El mantenimiento del software Git estó actualmente siendo supervisado y mantenido por una comunidad de mas de 1,312(2019) programadores los cuales contribuyen al desarrollo constante de Git. En cuanto a derechos de autor Git es un software libre que se distribuye bajo los términos de la version 2 de la Licencia Pública General de GNU.

Ventajas y Desventajas

Ventajas

  • Fuerte apoyo al desarrollo no lineal, por ende rapidez en la gestión de ramas y mezclado de diferentes versiones. Git incluye heramientas específicas para navegar y visualizar un historial de desarrollo no lineal. Una presunción fundamental en Git, es que un cambio será fusionado mucho más frecuentemente de lo que se escribe originalmente, conforme se pasa entre varios programadores que lo revisan.

  • Gestión distribuida. Git le da a cada programador una copia local del historial de desarrollo entero, y los cambios se propagan entre los repositorios locales. Los cambios se importan como ramas adicionales y pueden ser fusionados en la misma manera que se hacen con la rama local.

  • Los repositorios de información pueden publicarse por HTTP, HTTPS, FTP, RSYNC o mediante un protocolo nativo, ya sea a través de una conexion TCP/IP simple o a traves de cifrado SSH.

  • Los repositorios Subversion y SVK se pueden usar directamente con ‘git-svn’.

  • Gestión eficiente de proyectos grandes, dada la rapidez de gestión de diferencias entre archivos, entre otras mejoras de optimización de velocidad de ejecución.

  • Todas las versiones previas a un cambio predeterminado, implican la notificaión de un cambio posterior en cualquiera de ellas a ese cambio(denominado autenticación criptogrófica de historial).

Desventajas

  • Dificultad de aprendizaje rapido y sencillo usando la documentación oficial, por la gran cantidad de comandos y funciones disponibles.

Usando Git como control de versiones

Requisitos

  • S.O. Windows, Linux o MacOS

  • Como es un software muy eficiente y de bajos recursos cualquier PC de hoy en

dia puede instalar Git de manera facil y rapida.

Requisitos Servidor Git

  • Só se desea hacerlo de forma manual sin utilizar un software intermedio se

puede utilizar el siguiente tutorial en donde explica paso a paso [como montar

Git en un servidor](https://Git-scm.com/book/es/v1/Git-en-un-servidor).

Migrar SVN a Git

Para migrar un repositorio de SVN a Git se puede hacer con un solo comando

$ git svn clone <svn repositorio URL>  <parameters>

Despues se debe reconfigurar los origenes del repositorio(la URL del la ubicacion en el servidor Git), asi agregando el origen del servidor Git y elimiando el origen del servidor SVN si asi se desea.

A partir de este punto ya se puede trabajar mediante Git en el repositorio usando todos loa agregados de Git y dejando de trabajar sobre SVN.

Migrar SVN a Git, Versión 2

Buscando en algunas web’s varios usuarios recomeindan los siguientes pasos para migra run repositorio de SVN a Git:


# Creamos el repositorio en el servidor remoto

$ git init --bare repos/{repo}.git #repo es el nombre del repositorio, se ejecuta en la raiz del servidor GIT

$ cd repos/{repo}.git/

$ echo  "http://example.com/proyecto.git"  > cloneurl

$ echo  "Una buena descripcion del proyecto"  > description

$ git config gitweb.owner 'UserOwner'

$ git config http.receivepack true


# En nuestra maquina local

# -------------------------------------


# Instalamos el paquete de ubuntu

$ sudo apt-get install git-svn


# Carpetas donde vamos a obtener el proyecto

$ mkdir migration

$ cd migration


# Inicializamos el repositorio git para svn (Sin los datos no necesarios de svn)

$ git svn init http://svn.example.com/myproject --no-metadata


# Creamos un archivo que relacione los usuarios de subversion con los de git

# Ejecutamos esto con cada usuario del repositorio

$ echo  "user = User Name <user.email@contoso.com>"  >> users.txt


# Le indicamos a git donde encontrar la relacion de usuarios

$ git config svn.authorsfile users.txt


# Obtenemos todas las revisiones de svn y las interpretamos para git (puede demorar mucho tiempo)

# Puede que se bloquee o se interrumpa porque falta algun usuario, al volver a ejecutar el comando el continua desde

# la ultima revision obtenida

$ git svn fetch


# Subimos un nivel

$ cd ..


# Clonamos el repositorio nuevamente para que sea totalmente git

$ git clone migration myproject


# Entramos al repositorio git

$ cd myproject


# Borramos la referencia local del origen del repositorio

$ git remote rm origin


# Agregamos la referencia remota del origen

$ git remote add origin http://example.com/proyecto.git


# Enviamos el repositorio al servidor remoto (puede demorar un poco)

$ git push origin master


# Verificamos que todo haya cargado correctamente

$ git log


# Borramos la carpeta de la migracion

$ cd ..

$ rm -rf migration


# Para terminar, damos gracias por ser tan inteligentes 🙂


Apendice

Definiciones

1.- Atómicidad: Es la propiedad que asegura que una operacion se ha realizado o no, y por lo tanto ante un fallo del sistema no puede quedar a medias. Se dice que una operacion es atómica cuando es imposible para otra parte de un sistema encontrar pasos intermedios. Si esta operación consiste en una serie de pasos, todos ellos ocurren o ninguno.

Categorías
Desarrollo

Hashing a secure password to safe storage

Hashing a secure password to safe storage

In this paper i’ll show you how to create a secure password to storage in your DB or whatever you want, an example of the secure password we create here was:

// this pass is "SecurePassword"
hAQSI9Feddid/DX3F71SPeL7doHAGeRKgefJ7XImpY4QyOcUh9Ypew==

Let’s start with the coding challenge

Explanation about PBKDF2

by Wikipedia – PBKDF2

PBKDF2

In cryptography, PBKDF1 and PBKDF2 (Password-Based Key Derivation Function 2) are key derivation functions with a sliding computational cost, used to reduce vulnerabilities to brute force attacks.

PBKDF2 is part of RSA Laboratories’ Public-Key Cryptography Standards (PKCS) series, specifically PKCS #5 v2.0, also published as Internet Engineering Task Force’s RFC 2898. It supersedes PBKDF1, which could only produce derived keys up to 160 bits long. RFC 8018 (PKCS #5 v2.1), published in 2017, recommends PBKDF2 for password hashing.

Purpose and operation

PBKDF2 applies a pseudorandom function, such as hash-based message authentication code (HMAC), to the input password or passphrase along with a salt value and repeats the process many times to produce a derived key, which can then be used as a cryptographic key in subsequent operations. The added computational work makes password cracking much more difficult, and is known as key stretching.

When the standard was written in the year 2000 the recommended minimum number of iterations was 1, 000, but the parameter is intended to be increased over time as CPU speeds increase. A Kerberos standard in 2005 recommended 4, 096 iterations; Apple reportedly used 2, 000 for iOS 3, and 10, 000 for iOS 4; while LastPass in 2011 used 5000 iterations for JavaScript clients and 100, 000 iterations for server-side hashing.

Having a salt added to the password reduces the ability to use precomputed hashes (rainbow tables) for attacks, and means that multiple passwords have to be tested individually, not all at once. The standard recommends a salt length of at least 64 bits. The US National Institute of Standards and Technology recommends a salt length of 128 bits.

Alternatives to PBKDF2

One weakness of PBKDF2 is that while its number of iterations can be adjusted to make it take an arbitrarily large amount of computing time, it can be implemented with a small circuit and very little RAM, which makes brute-force attacks using application-specific integrated circuits or graphics processing units relatively cheap. The bcrypt password hashing function requires a larger amount of RAM (but still not tunable separately, i. e.fixed for a given amount of CPU time) and is slightly stronger against such attacks, while the more modern scrypt key derivation function can use arbitrarily large amounts of memory and is therefore more resistant to ASIC and GPU attacks.

Code for the secured password generation

For create a secure password we need to follow the next steps.

One of the important thing you need to know is the password we hashed is on One-Way-Hash so this means the result string can’t do a reversible hashing, so you can’t obtain the password from the hash string.

1.-create a salt

we need to create a salt this will be the unique byte array that will be used to create a hash, when you need to check if the password was correct you need this array of bytes to recreate the secure password.

// 1.-Create the salt value with a cryptographic PRNG
byte[] salt;
new RNGCryptoServiceProvider().GetBytes(salt = new byte[20]);

2.-Create a hash

in this part we get a hash from password using the salt created in the last step.

// 2.-Create the RFC2898DeriveBytes and get the hash value
var pbkdf2 = new Rfc2898DeriveBytes(password, salt, 10000);
byte[] hash = pbkdf2.GetBytes(20);

3.-Combine salt and hash password

in this step we combine the salt and the hash password in an array of bytes.

// 3.-Combine the salt and password bytes for later use
byte[] hashBytes = new byte[40];
Array.Copy(salt, 0, hashBytes, 0, 20);
Array.Copy(hash, 0, hashBytes, 20, 20);

4.-Get the string password

here is the finish of the creating a secured password, in this step we gets the string from the password generated.

// 4.-Turn the combined salt+hash into a string for storage
hashPass = Convert.ToBase64String(hashBytes);

Code validation for the secured password

next to password generation we need to create a hashed password validation, because we use this code in a login or something like you brain imagine.

One important thing you need to know is

to verify if the password was correct you need to follow this steps:

  • get the hashed password from your storage, i.e. Database, JSON file, etc.
  • convert to array of bytes.
  • get the salt from the array.
  • hash the password entered from user with the salt you get from the array.
  • compare if the hash you get is the same as the hashed password.

1.-Extract the bytes from stored hash

first, we need to convert into bytes the hashed password.

// Extract the bytes
byte[] hashBytes = Convert.FromBase64String(hashPass);

2.-Get the salt

second, we need to get the salt from the bytes array.

// Get the salt
byte[] salt = new byte[20];
Array.Copy(hashBytes, 0, salt, 0, 20);

3.-Computhe the hash

next, we need to compute the hash with the password entered by user and the salt we got.

// Compute the hash on the password the user entered
var pbkdf2 = new Rfc2898DeriveBytes(password, salt, 10000);
byte[] hash = pbkdf2.GetBytes(20);

4.-Compare the user password with hash stored

to finish, we need to compare the user entered password we hashed and the stored hash.

// compare the results
for (int i = 0; i < 20; i++){
    if (hashBytes[i + 20] != hash[i])
    {
        throw new UnauthorizedAccessException();
    }
}

Conclusion

As a conclusion for this paper, the use of the Password-Based Key Derivation Function 2 is a good way to secure our data, but like wikipedia says now is unsecure, because the malintended people can use a cheap hardware to decript our hashed password.

also i think if you add a one more level of security especifically for your business maybe becomes secure.

Summary of the PasswordCryptography class

This class was wrote in C#.

public class PasswordCryptographyPbkdf2
{
    /// <summary>
    /// Get the hash of the password
    /// </summary>
    /// <param name="password">string password</param>
    /// <returns>Hash secured password</returns>
    public string GetHashPassword(string password)
    {
        string hashPass = string.Empty;

        // 1.-Create the salt value with a cryptographic PRNG
        byte[] salt;
        new RNGCryptoServiceProvider().GetBytes(salt = new byte[20]);

        // 2.-Create the RFC2898DeriveBytes and get the hash value
        var pbkdf2 = new Rfc2898DeriveBytes(password, salt, 100000);
        byte[] hash = pbkdf2.GetBytes(20);

        // 3.-Combine the salt and password bytes for later use
        byte[] hashBytes = new byte[40];
        Array.Copy(salt, 0, hashBytes, 0, 20);
        Array.Copy(hash, 0, hashBytes, 20, 20);

        // 4.-Turn the combined salt+hash into a string for storage
        hashPass = Convert.ToBase64String(hashBytes);

        return hashPass;
    }

    /// <summary>
    /// Check if the password is valid
    /// </summary>
    /// <param name="password">Entered by user</param>
    /// <param name="hashPass">Stored password</param>
    /// <returns>True if is Valid.</returns>
    public bool IsValidPassword(string password, string hashPass)
    {
        bool result = true;

        // Extract the bytes
        byte[] hashBytes = Convert.FromBase64String(hashPass);
        // Get the salt
        byte[] salt = new byte[20];
        Array.Copy(hashBytes, 0, salt, 0, 20);
        // Compute the hash on the password the user entered
        var pbkdf2 = new Rfc2898DeriveBytes(password, salt, 100000);
        byte[] hash = pbkdf2.GetBytes(20);
        // compare the results
        for (int i = 0; i < 20; i++)
        {
            if (hashBytes[i + 20] != hash[i])
            {
                throw new UnauthorizedAccessException();
            }
        }

        return result;
    }
}

Categorías
Desarrollo

A PowerShell Music Player

In this post will be create a Powershell script that play a list of songs in a folder you specified.

I take the example code form the Music Player v1.0.1 by -Powershell Gallery

This Music player only takes 7.65KB in space.

In RAM like you supposed is between 20MB and 30MB.

First we need to create a Powershell file call what ever you want, i call them «PlayMusic.ps1».

Next start to coding the script, we need to receive 5 parameters:

  • Music path
  • If is on Shuffle playing mode
  • If is on Loop playing mode
  • If you want to Stop
  • File type of songs

with this parameters now will have all the configuration to start plating music, so you ask how to use this parameters in Powershell, yes!! like this:

Param (
    [Alias('P')]  [String] $PathMusic,
    [Alias('Sh')] [switch] $Shuffle,
     [Alias('St')] [Switch] $Stop,
     [Alias('L')]  [Switch] $Loop,
    [Alias('Ft')] [String] $fileType)    

Next to this at the end of the file we need to put all the logic(right now is a mess) for the terminal input; maybe now works if you put all in one line but i’m no time to try, let’s try by yourself’s.

#Start-MediaPlayer
If ($Stop.IsPresent) {
    Start-MediaPlayer -St $Stop}ElseIf ($PathMusic) {
    If ($Shuffle.IsPresent) {
        If ($fileType) {
            Start-MediaPlayer $ -P $PathMusic -Sh $Shuffle -Ft $fileType
        }
        Else {
            Start-MediaPlayer $ -P $PathMusic -Sh $Shuffle -Ft ".flac" 
       }
    }
    ElseIf ($Loop.IsPresent) {
        If ($fileType) {
            Start-MediaPlayer -P $PathMusic -L $Loop -Ft $fileType
        }
        Else {
            Start-MediaPlayer -P $PathMusic -L $Loop -Ft ".flac"
        }
    }
        Else {
        Start-MediaPlayer -P $PathMusic -Ft ".flac"
    }
}
Else {
    Start-MediaPlayer -Ft ".flac"
}    

Like you see in the code i use the «.flac» format as default, because this is my prefered music file type.

Summary

Here you have all the complete code for this script it takes 161 code lines.

# Create a playlist of files from folder

Param(
    [Alias('P')]  [String] $PathMusic,
    [Alias('Sh')] [switch] $Shuffle, 
    [Alias('St')] [Switch] $Stop, 
    [Alias('L')]  [Switch] $Loop,
    [Alias('Ft')] [String] $fileType
)

function Start-MediaPlayer { 
    Param( 
        [Alias('P')]  [String] $Path, 
        [Alias('Sh')] [switch] $Shuffle, 
        [Alias('St')] [Switch] $Stop, 
        [Alias('L')]  [Switch] $Loop,
        [Alias('Ft')] [String] $fileType
    ) 
 
    If ($Stop.IsPresent) { 
        Write-Host "Stoping any Already running instance of Media in background." 
        Get-Job MusicPlayer -ErrorAction SilentlyContinue | Remove-Job -Force 
    } 
    Else {        
        #Caches Path for next time in case you don't enter Path to the music directory 
        If ($Path) { 
            $Path | out-file C:\Temp\Musicplayer.txt 
        } 
        else { 
            If ((Get-Content C:\Temp\Musicplayer.txt -ErrorAction SilentlyContinue).Length -ne 0) { 
                Write-Host "You've not provided a music directory, looking for cached information from Previous use." 
                $Path = Get-Content C:\Temp\Musicplayer.txt 
 
                If (-not (Test-Path $Path)) { 
                    Write-Host "Please provide a Path to a music directory.\nFound a cached directory $Path from previous use, but that too isn't accessible!" 
                    # Mark Path as Empty string, If Cached Path doesn't exist 
                    $Path = ''      
                } 
            } 
            else { 
                Write-Host "Please provide a Path to a music directory." 
            } 
        } 
  
        #initialization Script for back ground job 
        $init = { 
            # Function to calculate duration of song in Seconds 
            Function Get-SongDuration($FullName) { 
                $Shell = New-Object -COMObject Shell.Application 
                $Folder = $shell.Namespace($(Split-Path $FullName)) 
                $File = $Folder.ParseName($(Split-Path $FullName -Leaf)) 
                         
                [int]$h, [int]$m, [int]$s = ($Folder.GetDetailsOf($File, 27)).split(":") 
                         
                $h * 60 * 60 + $m * 60 + $s 
            } 
                     
            # Function to Notify Information balloon message in system Tray 
            Function Show-NotifyBalloon($Message) { 
                [system.Reflection.Assembly]::LoadWithPartialName('System.Windows.Forms') | Out-Null             
                $Global:Balloon = New-Object System.Windows.Forms.NotifyIcon             
                $Balloon.Icon = [System.Drawing.Icon]::ExtractAssociatedIcon((Get-Process -id $pid | Select-Object -ExpandProperty Path))                     
                $Balloon.BalloonTipIcon = 'Info'            
                $Balloon.BalloonTipText = $Message             
                $Balloon.BalloonTipTitle = 'Now Playing'             
                $Balloon.Visible = $true             
                $Balloon.ShowBalloonTip(1000) 
            } 
                     
            Function PlayMusic($Path, $Shuffle, $Loop) { 
                # Calling required assembly 
                Add-Type -AssemblyName PresentationCore 
     
                # Instantiate Media Player Class 
                $MediaPlayer = New-Object System.Windows.Media.Mediaplayer 
                         
                # Crunching the numbers and Information 
                $FileList = Get-ChildItem $Path -Recurse -Include *$fileType* | Select-Object fullname, @{n = 'Duration'; e = { get-songduration $_.fullname } } 
                $FileCount = $FileList.count 
                $TotalPlayDuration = [Math]::Round(($FileList.duration | Measure-Object -Sum).sum / 60) 
                         
                # Condition to identifed the Mode chosed by the user 
                if ($Shuffle.IsPresent) { 
                    $Mode = "Shuffle" 
                    $FileList = $FileList | Sort-Object { Get-Random }  # Find the target Music Files and sort them Randomly 
                } 
                Else { 
                    $Mode = "Sequential" 
                } 
                         
                # Check If user chose to play songs in Loop 
                If ($Loop.IsPresent) { 
                    $Mode = $Mode + " in Loop" 
                    $TotalPlayDuration = "Infinite" 
                } 
                         
                If ($FileList) {     
                    '' | Select-Object @{n = 'TotalSongs'; e = { $FileCount }; }, @{n = 'PlayDuration'; e = { [String]$TotalPlayDuration + " Mins" } }, @{n = 'Mode'; e = { $Mode } }  
                } 
                else { 
                    Write-Host "No music files found in directory $Path."  
                } 
                         
                Do { 
                    $FileList | ForEach-Object { 
                        $CurrentSongDuration = New-TimeSpan -Seconds (Get-SongDuration $_.fullname) 
                        $Message = "Song : " + $(Split-Path $_.fullname -Leaf) + "`nPlay Duration : $($CurrentSongDuration.Minutes) Mins $($CurrentSongDuration.Seconds) Sec`nMode : $Mode"
                        $MediaPlayer.Open($_.FullName)                    # 1. Open Music file with media player 
                        $MediaPlayer.Play()                                # 2. Play the Music File 
                        Show-NotifyBalloon ($Message)                   # 3. Show a notification balloon in system tray 
                        Start-Sleep -Seconds $_.duration                # 4. Pause the script execution until song completes 
                        $MediaPlayer.Stop()                             # 5. Stop the Song 
                        $Balloon.Dispose(); $Balloon.visible = $false                            
                    } 
                }While ($Loop) # Play Infinitely If 'Loop' is chosen by user 
            } 
        } 
 
        # Removes any already running Job, and start a new job, that looks like changing the track 
        If ($(Get-Job Musicplayer -ErrorAction SilentlyContinue)) { 
            Get-Job MusicPlayer -ErrorAction SilentlyContinue | Remove-Job -Force 
        } 
 
        # Run only if Path was Defined or retrieved from cached information 
        If ($Path) { 
            Write-Host "Starting a background Job to play Music files" 
            Start-Job -Name MusicPlayer -InitializationScript $init -ScriptBlock { playmusic $args[0] $args[1] $args[2] } -ArgumentList $Path, $Shuffle, $Loop | Out-Null 
            Start-Sleep -Seconds 3       # Sleep to allow media player some breathing time to load files 
            Receive-Job -Name MusicPlayer | Format-Table @{n = 'TotalSongs'; e = { $_.TotalSongs }; alignment = 'left' }, @{n = 'TotalPlayDuration'; e = { $_.PlayDuration }; alignment = 'left' }, @{n = 'Mode'; e = { $_.Mode }; alignment = 'left' } -AutoSize 
        } 
    }      
}

#Start-MediaPlayer
If ($Stop.IsPresent) {
    Start-MediaPlayer -St $Stop
}
ElseIf ($PathMusic) {
    If ($Shuffle.IsPresent) {
        If ($fileType) {
            Start-MediaPlayer $ -P $PathMusic -Sh $Shuffle -Ft $fileType
        }
        Else {
            Start-MediaPlayer $ -P $PathMusic -Sh $Shuffle -Ft ".flac"
        }
    }
    ElseIf ($Loop.IsPresent) {
        If ($fileType) {
            Start-MediaPlayer -P $PathMusic -L $Loop -Ft $fileType
        }
        Else {
            Start-MediaPlayer -P $PathMusic -L $Loop -Ft ".flac"
        }
    }    
    Else {
        Start-MediaPlayer -P $PathMusic -Ft ".flac"
    }
}
Else {
    Start-MediaPlayer -Ft ".flac"
}
Categorías
Electronica

Pocket C.H.I.P my amazing DEV machine

I’m introduce you one of the amazing DEV machine, the Pocket C.H.I.P; I love so much this device because it has Linux Debian, so you can develop, surf the internet, creates music(with sunvox), play games(and creates with pico-8), etc. So let’s begin with all the information about it.

the story

Based in Oakland, CA., Next Thing Co. is the brainchild of founders Dave Rauchwerk, Gustavo Huber, and Thomas Deckert. The company originated as a Kickstarter project to get their $9 miniature computer, the CHIP, off the drawing board and into people’s hands.

Two million dollars and 29,000 backers later, Next Thing Co. was launched. Today, the company cranks out several variations of the CHIP miniature computer including the Pocket CHIP.

why we like it

The Pocket CHIP is like a mobile hacking station. This little number allows you to play thousands of cool 16-bit video games on the go, make music, write code in a Linux terminal, and do pretty much everything a stipped down computer could do –and EVERYTHING can be hacked.

For games, that means if you don’t like the sound effects, change ‘em. Want to remove the wall blocking your way, erase it. It’s like Minecraft from 1980’s –and yes, you can play Minecraft on it.

The hardware and software is all open sourced, so the limits to what’s possible is just your imagination.

Plus, when you use this thing in public, you look like some cyberpunk hacker — talking major Mr.Robot vibes.

the competition

The most similar competitor is the Raspberry Pi. The Pi has a massive community of users and thousands of third-party extensions. If you’re unfamiliar with miniature computer boards, go with the Pi. It’s easy to pick up and you’ll be able to find help resources if you get stuck, unlike the CHIP. That said, it’s not portable. The Pocket CHIP is.

Another board to consider is the Arduino UNO microcontroller. However, this is a microcontroller and not an actual computer. Basically, that means that you upload a small amount of code and the board just runs, there’s no user interface to mess around in. These are best for smaller IoT applications, not coding projects.

About NTC

The company who produce the C.H.I.P, C.H.I.P PRO and Pocket C.H.I.P is went to bankrupt, they no sell and not send any of his products, but a third party partner go live in a webpage is selling all the stock of this 3 devices, in my opinion about bankrupt is a bad thing because is a great product and I want a new version of Pocket C.H.I.P, also you thing we have the RPi(I have one as my retro console) and maybe is a much better option but the aggregate is a bigger cost here in Mexico.

Categorías
Noticias

50 years of Moon Landing

Today the humanity celebrates the Moon Landing 50 years ago and all the technology they give us

Today 50 years ago and four days after it’s launch, the Apollo XI performed the first Moon Landing making history! thousands of people gathered aroud their radios and TV’s to be part of the celebration, and Mexico was no exception

«Tranquility base here, The Eagle has landed»

Most everyone knows these iconic words spoken by Apollo 11 Commander Neil A. Armstrong after he and fellow crewmate, Lunar Module Pilot Edwin “Buzz” Aldrin, set the lunar module, called Eagle, on the surface of the Moon 50 years ago, on July 20, 1969. Command Module Pilot Michael Collins remained in the command and service module (CSM), called Columbia, orbiting above.

«The Apollo 11 mission to the Moon had many important milestones along the way,” Collins said. “More than anything else, it was the attention to detail our workers and administrator gave to putting the equipment together on the ground, and then testing it in as close to flight conditions as they could.»

Information and Pictures by –Nasa

Categorías
Desarrollo

Face Detection in Python

Hi in this post i’ll show you how to use OpenCV library to detect faces inside a picture, in a future post i’ll show you how to detect in a Real-Time video that was amazing stuff to practice the visual recognition.

well let’s start

Requirements

check your version of python or install python 3.6.

python --version

then we need to install OpenCV library by searching in the official webpage in my local environment i use the OpenCV v4.1 you can use instead a previous version v3.X, i recommend you to follow the official instructions to install in the documentation.

Code the Face Detection solution

Now we start coding the face detection program. First need to import the OpenCV library and the system library(could be optional, i use this library to get a parameter when i run the python code).

import cv2
import sys

Next to import statements, we need to get the parameter passed from the user, this parameter was the picture to test in the face detection program.

# Get user supplied values
imagePath = sys.argv[1]

In the next part we need to add in our code is the magic for face detection this part is called Haar Cascade feature; you maybe ask why is a haar cascade, well now i’ll explain you what it is.

Object Detection using Haar feature-based cascade classifiers is an effective object detection method proposed by Paul Viola and Michael Jones in their paper, «Rapid Object Detection using a Boosted Cascade of Simple Features» in 2001. It is a machine learning based approach where a cascade function is trained from a lot of positive and negative images. It is then used to detect objects in other images. Here we will work with face detection. Initially, the algorithm needs a lot of positive images (images of faces) and negative images (images without faces) to train the classifier. Then we need to extract features from it. For this, haar features shown in below image are used. They are just like our convolutional kernel. Each feature is a single value obtained by subtracting sum of pixels under white rectangle from sum of pixels under black rectangle.

Now we have an idea was the HaarCascade can continue with the code, i’m using the Haar cascade file created by Rainer Lienhart ( the file you found in the repository of the code), we need to add the file to the code.

cascPath = "haarcascade_frontalface_default.xml"

Next, we need to train the OpenCV classifier with the haar cascade file.

# Create the haar cascade
faceCascade = cv2.CascadeClassifier(cascPath)

In the next step we need to read the image and set to gray color because OpenCV do better job with gray scale pictures with haar cascade classifier.

# Read the image
image = cv2.imread(imagePath)
gray = cv2.cvtColor(image, cv2.COLOR_BGR2GRAY)

In this part the magic is done, the OpenCV framework do the magic detecting the faces inside an image and return the position of the face in the image, you can adjust the parameters to get more detailed results or more crazy haha!!!.

# Detect faces in the image
faces = faceCascade.detectMultiScale(
    gray,
    scaleFactor=1.05,
    minNeighbors=5,
    minSize=(30, 30),
    flags=cv2.CASCADE_SCALE_IMAGE)

To finish our code for face detection just print the number of faces found in the image and then draw a rectangle with the face inside them, and show a windows with the images and the faces rounded; for close the window press any key.

print("Found {0} faces!".format(len(faces)))
# Draw a rectangle around the faces
for (x, y, w, h) in faces:
    cv2.rectangle(image, (x, y), (x+w, y+h), (0, 255, 0), 2)

height, width, channels = image.shape
cv2.imshow("{0} Faces found".format(len(faces)), image)
cv2.waitKey(0)

This is an example of the result more accurate.

Like you see in the image they recognize a hand like a face, that was some of the issues i found, i try to set more accurate values but it detect less faces you can play with it to see how it works.

And this is another example, like you see detect many faces in a low resolution picture but have a lot of errors, in this image and this configurations only 1 face is not detected.

Complete code

Here is the complete code, like you see only takes 33 lines with white spaces, it is a really short program with powerfull applications.

import cv2
import sys

# Get user supplied values
imagePath = sys.argv[1]
cascPath = "haarcascade_frontalface_default.xml"

# Create the haar cascade
faceCascade = cv2.CascadeClassifier(cascPath)

# Read the image
image = cv2.imread(imagePath)
gray = cv2.cvtColor(image, cv2.COLOR_BGR2GRAY)

# Detect faces in the image
faces = faceCascade.detectMultiScale(
    gray,
    scaleFactor=1.05,
    minNeighbors=5,
    minSize=(30, 30),
    flags=cv2.CASCADE_SCALE_IMAGE)

print("Found {0} faces!".format(len(faces)))

# Draw a rectangle around the faces
for (x, y, w, h) in faces:
    cv2.rectangle(image, (x, y), (x+w, y+h), (0, 255, 0), 2)

height, width, channels = image.shapecv2.imshow("{0} Faces found".format(len(faces)), image)
cv2.waitKey(0)

Conclusion

For finish this post, like you see, if you use the actual solution the face detection you can develop a more detailed program like a doorbell or something like a cam in the traffic light to detect a face and maybe do a better recognition of the person face.

Next to this you maybe try to do the same program but in a real video or wait for my next post to learn how to do it.

Categorías
Desarrollo

REST API NodeJS

Well!!, now i’ll show you how to create an API REST in NodeJS in a simple steps, we take about 30 min or less to create, if you have some knowledge about javascript it becomes easy to understand all the code.

Let’s Start!!!

NOTE: I warning you that i’m beginner in NodeJS, i shared this with you because is a good entry into de API REST and NodeJS.

Create the Project

To start we need to create the NodeJS project, so you start creating a folder and then execute the following code in the terminal or cmd:

npm init

After you follow all the configuration steps by NodeJS next is install all the dependencies we need.

npm install body-parser --save
npm install cors --save
npm install express --save
npm install mysql --save

The ‘CORS’ dependency maybe you don’t need to install but if you want to avoid some communication errors i recommend you install. The ‘MySQL’ dependency, you can change for your preferred database.

Files

We need to create a file called ‘server.js‘ and change in the ‘package.json‘ main property to this file name because there is set to ‘index.js‘.

Dependencies

We need to add the following dependencies to make work our API.

NOTE: I use MySQL as database provider.

NOTE 2: I create an API that make CRUD functions to the ‘sakila’ database in MySQL Server.

var express = require('express');
var app = express();
var bodyParser = require('body-parser');
var mysql = require('mysql');
const cors = require('cors');

In this dependencies i add the ‘cors’ dependency because when i try to consume from Angular i have some problems to connect into the API.

Initialization

Here we need to initialize some dependencies that i will use later in the API.

NOTE: I suppose you’ll have some knowledge about javascript, so i avoid the obvious parts about the code and explain the important things.

app.use(bodyParser.json());
app.use(cors());
app.use(bodyParser.urlencoded({extended: true}));

API functions

Now will add all the API functions, in this point the users and the API will can communicate between each other.

Default Route

// default 
routeapp.get('/', function(req, res) 
{    
    return res.send({ error: true, message: 'hello' });
});

One thing to explain about this is i return a JSON object standardized in all the responses, because i think i have more control about the data the user gets.

NOTE: the JSON is:

{ error: true, data: data, [value1:value1,...] }

This default route maybe if you need, the code becomes the token initialization or some message to check if the user connects and get data from the API correctly.

MySQL Configuration

Here you can change for you’re preferred database.

// connection configurations
var dbConn = mysql.createConnection({    
    host: 'localhost',
    user: 'admin',
    password: 'root',
    database: 'sakila'});
// connect to database
dbConn.connect();

In the createConnection just add the login information for the database, and open the connection.

NOTE: the database i use is sakila from the example data installed in MySQL server, and the table i work is staff.

Get User

This first entry point in our API i use to do a simple login in an Angular application i created for this API, and is not neccesary you add or maybe you have a better idea to do a user login, *in the comments put your solution fo this part*.

// Retrieve user with username 
app.get('/user/:username&:password', function(req, res) {
    const username = req.params.username;
    const password = req.params.password;
    if (!username) {
        return res.status(400).send({ error: true, message: 'Please provide username' });
    }
    dbConn.query('SELECT * FROM sakila.staff WHERE username="' + username + '" AND password="' + password + '";',function(error, results, fields) {
        if (error) throw error;
        if (results.length > 0) {
            return res.send({ error: false, data: results[0], username, password });
        } else {
            return res.send({ error: true, data: results[0], username, password });
        }
    });
});

Check in this code i use ‘req.params.YOUR_PARAM’ to get the parameter send in the API call, like you see is easy to get the data, one important thing is you can send in JSON format if you do a POST. Here as you see is just a GET request, maybe is unsecure i would use a POST because i send a private data, but this is for learning and i want to show you how you have to pass some parameters in a GET request. Like you see the connection to the database is simple like the query string and set the data i need.

Get all users

Now we add the entry point to get all the users in the database, check the following code:

// Retrieve all users 
app.get('/users/', function(req, res) {
    dbConn.query('SELECT * FROM sakila.staff', function(error, results, fields) {
        if (error) throw error;
        if (results.length > 0) {
            return res.send({ error: false, data: results });
        } else {
            return res.send({ error: true, data: results });
        }
    });
});

As you see is a simple select from all the table and all the data inside.

Get user by Id

This part is in case you need to get just one user instead of all.

// Retrieve user with id 
app.get('/user/:staff_id', function(req, res) {
    let user_id = req.params.staff_id;
    if (!user_id) {
        return res.status(400).send({ error: true, message: 'Please provide user_id' });
    }
    dbConn.query('SELECT * FROM sakila.staff where staff_id=?', user_id, function(error, results, fields) {
        if (error) throw error;
        if (results.length > 0) {
            return res.send({ error: false, data: results[0], user_id });
        } else {
            return res.send({ error: true, data: results[0], user_id });
        }
    });
});

Simple like that, i get a user with the id.

Add User

Here starts the magic because the previous code is just for get data but now we go to add a user. here use the POST action in the HTTP call to send the private data more secure.

NOTE: For more standardized and more maintainable API i will receive a JSON object with the user information and then insert directly the object into the database.

// Add a new user  
app.post('/add', function(req, res) {
    let user = req.body;
    console.log("add user");
    if (!user) {
        return res.status(400).send({ error: true, message: 'Please provide user' });
    }
    dbConn.query("INSERT INTO sakila.staff SET ? ", user, function(error, results, fields) {
        if (error) throw error;
        return res.send({ error: false, data: results, message: 'New user has been created successfully.' });
    });
});

Like you see in this part the most difficult to understand is the insert, because we add the complete object into de database, but like you see works correctly and is more easy to maintain this code and solve issues.

NOTE: In this part i can’t check in other database if works like MySQL sending a complete object.

Update User

As you see in the previous code in this is maybe the same thing, but we use the PUT action in the HTTP call instead of the POST action.

//  Update user with id
app.put('/update', function(req, res) {
    let user = req.body;
    if (!user.staff_id || !user) {
        return res.status(400).send({ error: user, message: 'Please provide user and user_id' });
    }
    dbConn.query("UPDATE sakila.staff SET ? WHERE staff_id = ?", [user, user.staff_id],
        function(error, results, fields) {
            if (error) throw error;
            return res.send({ error: false, data: results, message: 'user has been updated successfully.' });
        });
});

Delete user

Now add the code for delete a user using the DELETE action in the HTTP call.

//  Delete user
app.delete('/delete/:staff_id', function(req, res) {
    let user_id = req.params.staff_id;
    if (!user_id) {
        return res.status(400).send({ error: true, message: 'Please provide user_id' });
    }
    dbConn.query('DELETE FROM sakila.staff WHERE staff_id = ?', [user_id], function(error, results, fields) {
        if (error) throw error;
        return res.send({ error: false, data: results, message: 'User has been updated successfully.' });
    });
});

Now all the CRUD actions are complete.

Finishing the file

Now to finish our API server file just need to add at the end of the file the following code:

// set port
app.listen(3000, function() {
    console.log('Node app is running on port 3000');
});
module.exports = app;

In this part just add the port and some log in the console to get notice that all works correctly. At this point all the API is complete and now you can run with the following code:

npm start

Now you can use your own webpage or something software to make API calls, you should see all the data running and in your database the data modified.

Conclusion

Now you have a complete API REST functionallity to use in all your projects, now your homework is to make secure the API using token authentication and make some improvements or adapt the code for you need. I enjoy to make my first post here and start my dream help the people to enter into this wonderful path.

Categorías
Desarrollo

101 Tips For Being A Great Programmer (& Human)

img { width: 75%; border-radius: 5%; }

BY Emma Wedekind in Dev.to

  1. Get good at Googling

    Being a programmer is all about learning how to search for the answers to your questions. By learning to Google things effectively, you’ll save a lot of development time.

  2. Under promise and over deliver

    It’s better to let your team know a task will take three weeks and deliver in two than the other way around. By under promising and over delivering, you’ll build trust.

  3. Be nice to your designers; they’re your friends

    Designers provide solutions to user pain points. Learn from them and work cohesively to build effective products.

  4. Find a mentor

    Find someone you can learn from and bounce ideas off Coding Coach is a great place to get started if you need a technical mentor!

  5. Be a mentor

    Be someone others can learn from and bounce ideas off of. We’d love to have you as a mentor over at Coding Coach

  6. Write useful comments

    Write comments which explain the «why» and not the «what».

  7. Name variables and functions appropriately

    Functions and variables should accurately denote their purpose, so myCoolFunction won’t fly.

  8. Take vacations

    We all need time to de-compress. Take that trip you’ve been wanting. Your brain and your co-workers will thank you.

  9. Delete unused code

    No reason to accrue more technical debt.

  10. Learn to read code

    Reading code is an undervalued skill, but an invaluable one.

  11. Establish a healthy work/life balance

    You need time to de-compress after a long workday. Shut off work notifications, remove apps off your phone. Meeting

  12. Only schedule necessary meetings

    Can it be solved in an email or a Slack message? If so, avoid a meeting. If not, be conscious of the duration. Aim for less.

  13. Pair program

    Pair programming allows you to play the role of both teacher and student.

  14. Write great emails

    Learn to capture your audience in your emails by being succinct yet clear. Nobody wants to read your four-page email Jerry.

  15. Get involved in the community

    Surrounding yourself with like-minded people will motivate you to push through the lows.

  16. Clean up your branches

    Clean up your version control branches like you’d clean your house before your in-laws came for a visit. If you don’t need it, discard it; don’t just throw it in the closet.

  17. Don’t gate keep, Be inclusive.

    Don’t tell others they aren’t good enough to be in the industry. Everyone has value.

  18. Keep learning

    You’ve chosen a profession that requires continuous learning. Learn to love it.

  19. Don’t give up

    It won’t always be easy. But we all started at the same place. You can do it.

  20. Take tasks that scare you

    If it doesn’t scare you, it isn’t going to help you grow.

  21. Clarify requirements before starting

    You should understand the acceptance criteria before delving into writing the code. It will save you time and pain later down the line.

  22. Have a toolbox

    Have a set of tools which you know inside-and-out. Know which tools serve which purpose and when a project can benefit from using one over another.

  23. Learn to love constructive criticism

    Ask trusted colleagues and friends for constructive criticism. It will help you grow as a programmer and as a human.

  24. Be open-minded

    Technology changes, and it changes quickly. Don’t oppose new technology; learn it and then form an opinion.

  25. Stay relevant

    Stay up-to-date on the latest tech news by following publications, blogs, podcasts, and tech news.

  26. Focus on problem solving

    Strong problem solving skills can conquer any problem. Hone in on what it takes to solve a problem.

  27. Stay humble

    No matter what title you hold or what company you work form, stay humble. Presentation

  28. Learn to give a great presentation

    Learn how to captivate your audience and give effective presentations.

  29. Examine all solutions before jumping in

    Don’t jump straight into the first possible solution. Examine all paths before delving into the code.

  30. Find your niche

    There are many divisions within the tech industry. Find the area that interests you most and become an expert.

  31. Develop good habits

    Try to build consistent, and healthy, habits such as removing distractions, time-boxing tasks, being present in meetings, and starting with the most important task first. It might take some getting used to but it will be worth it in the long-run.

  32. Learn to debug

    Explore the browser debugger tools. Learn the ins-and-outs of debugging with your IDE. By learning the most effective methods for debugging a problem and tracing errors, you’ll be able to solve even the most difficult bugs.

  33. Exercise your current skills

    Just because you currently know a skill doesn’t mean you shouldn’t exercise it. Skills fade with time unless consciously improved upon, and this industry evolves so rapidly it’s important to keep practicing. Get out of the mindset that «I’ve always done it this way» and into the mindset of «Is there a better way to do this?» Just because you’ve got a six pack now, doesn’t mean you can eat a 🍩 a day and stay that way.

  34. Understand the why

    There will be times when you have to voice your opinion, so it’s important to understand the why behind it. Why is solution A better than solution B? Provide a valid argument and your opinions will be much more sound.

  35. Know your worth

    You are a commodity, and should be paid appropriately. Be aware of the industry averages in your geographic location. If you’re making less money, it’s time to have a chat with your manager. Go after what you deserve.

  36. Don’t be afraid to ask for help

    If you’re stuck on a problem and spending too much time searching for a solution, it’s time to ask for help. We’re all human. We all need help. There is no shame in reaching out to a colleague for support.

  37. Learn to learn

    People learn in different ways. Some learn best through video tutorials, others through reading a book. Figure out your learning style and practice it diligently.

  38. Be kind

    There will be times when you’re asked to provide feedback on a colleague. Be kind. You can voice your opinions about Deborah’s lack of initiative without ripping her to shreds.

  39. Take breaks

    It’s nearly impossible to spend 8 consecutive hours coding. You’ll burn out quickly and make a lot of mistakes. So set a timer to remind yourself to stop and take a break. Go for a walk. Get a coffee with a colleague. Stepping away from the screen will positively impact your productivity and the quality of your work.

  40. Track your progress

    Learning to code takes time and can be extremely disheartening when you don’t see progress. So it’s important to track your achievements and progress towards your goals. Keep a small list next to your computer and each time you achieve something, write it down, no matter how small. Atomic achievements compound to much larger rewards.

  41. Don’t rely on a framework or library

    Learn the nuances of a language better than the ins-and-outs of a framework or library. You don’t necessarily need to learn one before another, but understanding why a framework or library works the way it does will help you write cleaner and more performant code.

  42. Learn to love code reviews

    Having someone read and analyze your code can be terrifying, but can offer you invaluable feedback which will make you a better programmer. You should also work on your ability to conduct a good code review.

  43. Learn about tangential spaces

    Learn some basics about tangential spaces, such as design, marketing, frontend development or backend development. It will help you to become a more well-rounded programmer.

  44. Don’t choose the comfortable technology, choose the right one

    Each project will have different needs, and as such we must choose the right tools for the job. Although it’s comfortable to choose technologies you’ve worked with previously, if they don’t suit the needs of the project, alternatives should be explored.

  45. Take responsibility for your mistakes

    All humans make mistakes and you will many many throughout your career. Thus it’s important to own up and take responsibility when you’ve made a mistake. It will build trust with your team members and management.

  46. Review your own code

    Before opening a pull request, review your own code. If this were the work of a colleague, what comments would you make? It’s important to first try to diagnose problems or mistakes before requesting a code review.

  47. Learn from your failures

    Failure is simply not achieving the expected outcome, and is not necessarily a bad thing. We all have many failures during the course of our careers. Learn from your downfalls. What can you do differently next time?.

  48. Recognize your weaknesses

    Get to know yourself. What are your weaknesses? Maybe you always forget to update the tests before pushing. Or maybe you are really bad at replying to emails. Learn your weaknesses so you can actively work to address them.

  49. Stay curious

    This industry is ever-evolving, so curiosity will be important. If you don’t understand something, be it a project requirement or a line of code, speak up. Nobody will criticize you for asking for clarification and you’ll create better code as a result. Book

  50. Don’t try to learn everything

    There is an infinity pool of knowledge in the world and it is simply impossible to conquer it all. Pick several topics to master and leave the rest be. You can acquire working or tangential knowledge about other areas, but you cannot possibly master everything.

  51. Kill your darlings

    Just because you write some code doesn’t mean you need t be emotionally attached to it. Nobody likes their work being thrown out, but code has a life cycle, so there’s no need to be territorial about it. 52

  52. Have your team’s back

    Good teams have each others’ backs. This creates a safe space to try new things without fear of retribution.

  53. Find inspiration in the community

    Find a few people in the industry you admire. It will inspire you to keep working on your projects or try new things.

  54. Value your work

    Regardless of how much experience you have or what your job title is, your work has value. Give it the value it deserves.

  55. Disable distractions

    Turning off Slack notifications, text messages, emails, and social media will help you focus and maximize your workday.Jerry won’t fall apart if it takes you 30 minutes to respond to his message.

  56. Be supportive

    Try and support your team members whether that’s by attending an important presentation or helping them if they get stuck.

  57. Give credit where credit is due

    If someone does great work, tell them. Positive re-enforcement is a great way to build trust with your team members and help their careers. They’ll be more likely to help you along as well.

  58. Test your code

    Tests are important. Unit tests, regression tests, integration tests, end-to-end tests. Test your code and your product will be much more stable.

  59. Plan out your approach

    When you receive a new feature request or get a new bug ticket, first plan your attack. What do you need to solve this problem or develop this feature? Taking even just a few minutes to plan your attack can save you hours of frustration.

  60. Learn to pseudocode

    Pseudocoding is a great skill to have because it allows you to think through complex problems without wasting time writing lines of code. Write an approach down on paper, run through different test cases and see where the pitfalls are.

  61. Keep track of your achievements

    If you win an award at work, write it down. If you develop a crucial feature, write it down. You’ll create a backlog of things which can aid with a promotion or boost your morale on a tough day.

  62. Learn programming foundations

    Learn some basic sorting and searching algorithms and data structures. These are language-agnostic and can help you solve problems across languages.

  63. Choose technology for longevity & maintainability

    Although it’s fun to test out the newest technologies, pick those which will be easy to maintain within an enterprise application. Your team will thank you for years to come.

  64. Learn design patterns

    Design patterns are useful tools for architecting code. You may not need them for every project, but having a basic understanding of them will help scaffold out larger applications.

  65. Reduce ambiguity

    Instead of writing convoluted code which shows off your snazzy programming skills, aim for readability and simplicity. This will make it easier for your team members to contribute.

  66. Pay off technical debt

    Technical debt can have massive performance implications, so if you’re able to refactor, you should.

  67. Ship often

    Instead of shipping a massive upgrade once every month, ship more frequently with smaller changelogs. You’re less likely to introduce bugs and breaking changes.

  68. Commit early and often

    Committing early and committing often is the best way to ensure that your work remains clean and also reduces the stress of accidentally reverting important changes.

  69. Learn when to ask for help

    Not only should you not be afraid to ask for help, but you should learn when to ask for help. You should always try to solve a problem before asking for help, and keep track of the things you try. But when you’ve been stumped by a simple problem for over an hour, the cost outweighs the benefit, and you should reach out to a colleague.

  70. Ask effective questions

    When asking a question, try to be as specific as possible.

  71. Get feedback on unfinished work

    Your work doesn’t need to be finished for you to get feedback. If you’re uncertain of the direction, ask a trusted colleague to review the validity of your solution.

  72. Read documentation

    Documentation is the purest source of truth about a technology, so learning to read it can quickly help you to become an expert.

  73. Try all the things

    Nothing is stopping you from trying a solution to a problem. What do you have to lose?

  74. Speak up in meetings

    Your ideas and opinions are valuable so participating in meetings will help you develop a rapport with your team as well as management.

  75. Collaborate cross-team

    If you get an opportunity to with with another team in your company, go for it.

  76. Have passion projects

    When you work 40 hours a week, it’s important to take time for passion projects. They help you reinvigorate your love of programming and try new technologies you might not have access to at work.

  77. Define your career goals

    It’s important to have an idea of your ideal trajectory for your career. If you don’t, you’re trying to shoot an arrow without having a target.

  78. Get involved in the conversation

    Comment on blogs, participate in Twitter threads. Engage with the community. You’ll learn a lot more from being an active bystander than a wallflower.

  79. Prioritize tasks

    Learning to prioritize your tasks will help you enhance your productivity. Keep an active to-do list of immediate daily tasks as well as longer-term tasks and order them by most important.

  80. Don’t overlook the details

    Details can make a big difference in a project.

  81. Trust your teammates

    Your teammates were hired for their skills. Use them and trust them to get the job done.

  82. Learn to delegate

    If you’re in a leadership position, learn how to delegate effectively. It will save you time and frustration. You cannot do it all.

  83. Don’t compare yourself to others

    The only thing you should compare yourself to is who you were yesterday.

  84. Surround yourself with allies

    Learning to program will be a long, and not always easy, journey. Surround yourself with the people who build you up and encourage you to keep going.

  85. Don’t start for scale

    Starting for scale is a surefire way to become overwhelmed. Build with scalability in mind, but don’t start scaling until you need it. This way you don’t overwhelm your team with unnecessary bloat, but you maintain the ability to grow.

  86. Weigh performance implications

    If you want to use a cool, new technology you should weigh the performance implications of doing so. Could you implement something similar without taking a performance hit? If so, you may want to re-think your approach.

  87. Don’t discriminate

    Don’t discriminate against new technologies or ideas. Be open-minded about the possibility of learning new skills. Also don’t discriminate against people. We all deserve respect.

  88. Apply for jobs you aren’t qualified for

    You will never meet every requirement for a job. So take a chance and apply! What do you have to lose?

  89. Modularize your code

    You could write all of your code in one long file, but this isn’t maintainable. By modularizing, we ensure that our code is easily digestible and testable.

  90. Don’t JUST copy and paste

    If you’re going to copy and paste a solution from Stack Overflow, you should understand exactly what it does. Be intentional about the code you choose to introduce.

  91. Create an inspiring environment/setup

    You’ll be much more motivated to work if you enjoy your workspace and technical setup. Make it you.

  92. Remember where you came from

    We all started from the same place. As your skills and your job titles evolve, don’t forget where you came from.

  93. Try to remain optimistic

    If something goes wrong, try and be optimistic. Tomorrow is a new day. Optimism will help your team dynamic and your mental health.

  94. Continually re-assess your workflow

    Just because something works now doesn’t mean it always will. Re-evaluate your workflow and make adjustments where necessary.

  95. Learn how to work from home

    If you have the ability to work from home, learn to do so effectively. Find a separate office space, devoid of distractions. Boneskull wrote a great article on working from home you should check out.

  96. Code for accessibility

    Accessibility isn’t an afterthought, and it doesn’t have to be difficult. Everyone should be able to use your products.

  97. Honor your commitments

    If you tell someone you’ll deliver something by a certain date, honor that commitment. And if you can no longer make the deadline, speak up early.

  98. Be proactive

    If you have some extra bandwidth, find a task to help your team! They’ll be thankful you were proactive.

  99. Build an amazing portfolio

    A great portfolio sets you apart from the crowd. Use this as a chance to show off your programming and design skills!

  100. Remember why you love programming

    You got into this profession because it sparked an interest. If you’re getting frustrated and resentful, take a break. Give yourself space to reignite your passion for programming.

  101. Share your knowledge

    If you learn something cool, share it! Present at a local meetup or conference. Teach your coworker or mentee during lunch. Sharing your knowledge reinforces your knowledge while spreading the wealth.

Categorías
Desarrollo

Back to University :) !!!

Hello to all i wrote this code using the book The Little Book of Algorithms by @MrLauLearning, and i remember my first code challenges in university that i felt in that moment a long and hard way, but now 7 years later, i now that was hard and a long way, but very interesting and funny way i took.

def lower_run(num1, num2):        
    if( num1 < num2 ):        
        return num1    
    else:        
        return num2  
      
first_num = int(input("Enter the first number: "))
second_num = int(input("Enter the Second number: "))

lowest = lower_run(first_num,second_num)
print("The lowest number is "+str(lowest))

i’m getting back to check all the algorithms, i’m go to re-encounter with an amazing challenge and re-enforce my code i’ll write.

Diseña un sitio como este con WordPress.com
Comenzar